Top 21 Dockerfile best practices for container security
Container image security is critical as container usage increases due to AI workloads. One important aspect is creating Dockerfiles to build secure and efficient containers.


How a well-developed Dockerfile improves container security
Container image security is a complex and critical topic that simply cannot be ignored until it explodes with terrible consequences.
If you are familiar with containerized applications and microservices, you might have realized that your services might be micro; but detecting vulnerabilities, investigating security issues, and reporting and fixing them after the deployment is making your management overhead macro.
Much of this overhead can be prevented by shifting left security, tackling potential problems as soon as possible in your development workflow.
Getting rid of the known risks in advance will help reduce your security management and operational overhead. A well-crafted Dockerfile helps you avoid:
- Using privileged containers.
- Exposed unnecessary ports.
- Unused packages
- Leaked credentials.
What is a Dockerfile? A Dockerfile provides the instructions for how to build container images with Docker. The Dockerfile includes all the commands users can make in the container.
Because Dockerfiles are essentially blueprints for your container images, you need to consider security to prevent misconfigurations, vulnerabilities, and other container threats.
Apply the following 21 Dockerfile best practices to prevent security issues, optimize container security, and avoid common image errors and pitfalls.
We have grouped our selected Dockerfile best practices by topic. Please remember that Dockerfile best practices are just a piece in the whole secure development process.
1. Avoid unnecessary privileges
These tips follow the principle of least privilege so your service or application only has access to the resources and information necessary to perform its purpose.
1.1 Don't run rootless containers
It is a Dockerfile best practice to avoid running containers as root (UID 0). There are very few use cases where the container needs to execute as root, so don’t forget to include the USER instruction to change the default effective UID to a non-root user.
Furthermore, your execution environment might block containers running as root by default (i.e., Openshift requires additional security context constraints).
Running as non-root might require a couple of additional steps in your Dockerfile, as now you will need to:
- Make sure the user specified in the
USERinstruction exists inside the container. - Provide appropriate file system permissions in the locations where the process will be reading or writing.
FROM alpine:3.12
# Create user and set ownership and permissions as required
RUN adduser -D myuser && chown -R myuser /myapp-data
# ... copy application files
USER myuser
ENTRYPOINT ["/myapp"]
You might see containers that start as root and then use gosu or su-exec to drop to a standard user.
Also, if a container needs to run a very specific command as root, it may rely on sudo.
While these two alternatives are better than running as root, it might not work in restricted environments like Openshift.
1.2 Run as non-root
Again, let’s emphasize to avoid running your environment as root. Instead, run containers as non-root.
The USER instruction or --user flag will set the default user for the container, but the orchestrator or runtime environment (i.e., Docker run, Kubernetes, etc.) has the last word on who is the running container effective user.
Openshift and some Kubernetes clusters will apply restrictive policies by default, preventing root containers from running. Avoid the temptation of running as root to circumvent permission or ownership issues, and fix the real problem instead.
1.3 Don't bind to a specific UID
Run the container as a non-root user, but don’t make that user UID a requirement.
Why?
- Openshift, by default, will use random UIDs when running containers.
- Forcing a specific UID (i.e., the first standard user with
UID 1000) requires adjusting the permissions of any bind mount, like a host folder for data persistence. - If you run the container (
-uoption in docker) with the host UID, it might break the service when trying to read or write from folders within the container.
...
RUN mkdir /myapp-tmp-dir && chown -R myuser /myapp-tmp-dir
USER myuser
ENTRYPOINT ["/myapp"]
Code language: JavaScript (javascript)
This container will have trouble if running with an UID different than myuser, as the application won’t be able to write in /myapp-tmp-dir folder.
Don’t use a hardcoded path only writable by myuser. Instead, write temporary data to /tmp (where any user can write, thanks to the sticky bit permissions). Make resources world readable (i.e., 0644 instead of 0640), and ensure that everything works if the UID is changed.
...
USER myuser
ENV APP_TMP_DATA=/tmp
ENTRYPOINT ["/myapp"]
Code language: JavaScript (javascript)
In this example our application will use the path in APP_TMP_DATA environment variable. The default value /tmp will allow the application to execute as any UID and still write temporary data to /tmp. Having the path as a configurable environment variable is not always necessary, but it will make things easier when setting up and mounting volumes for persistence.
1.4 Make executables owned by root and not writable
It is a Dockerfile best practice for every executable in a container to be owned by the root user, even if it is executed by a non-root user and should not be world-writable.
This will block the executing user from modifying existing binaries or scripts, which could enable different attacks. By following this best practice, you're effectively enforcing container immutability.
Immutable containers do not update their code automatically at runtime and, in this way, you can prevent your running application from being accidentally or maliciously modified.
Try to avoid:
...
WORKDIR $APP_HOME
COPY --chown=app:app app-files/ /app
USER app
ENTRYPOINT /app/my-app-entrypoint.sh
Code language: JavaScript (javascript)
Most of the time, you can just drop the --chown app:app option (or RUN chown ... commands). The app user only needs execution permissions on the file, not ownership.
2. Reduce attack surface
It is a Dockerfile best practice to keep container images minimal. According to Sysdig’s 2025 Cloud-Native Security and Usage Report, container images saw a 300% increase in the overall number of packages included. It’s time to dial that back.
Avoid including unnecessary packages or exposing ports to reduce the attack surface. The more components you include inside a container, the more exposed your system will be and the harder it is to maintain, especially for components not under your control.
2.1 Use multi-stage builds to reduce image size
Make use of multi-stage building features to have reproducible builds inside containers.
In a multi-stage build, you create an intermediate container – or stage – with all the required tools to compile or produce your final artifacts (i.e., the final executable). Then, you copy only the resulting artifacts to the final image, without additional development dependencies, temporary build files, etc.
A well-crafted multi-stage build includes only the minimal required binaries and dependencies in the final image, and not build tools or intermediate files. This reduces the attack surface and decreases potential vulnerabilities.
It is safer, and it also reduces image size.
For a go application, an example of a multi-stage build would look like this:
#This is the "builder" stage
FROM golang:1.15 as builder
WORKDIR /my-go-app
COPY app-src .
RUN GOOS=linux GOARCH=amd64 go build ./cmd/app-service
#This is the final stage, and we copy artifacts from "builder"
FROM gcr.io/distroless/static-debian10
COPY --from=builder /my-go-app/app-service /bin/app-service
ENTRYPOINT ["/bin/app-service"]Code language: JavaScript (javascript)
With those Dockerfile instructions, we create a builder stage using the golang:1.15 container, which includes all of the go toolchain.
FROM golang:1.15 as builder
Code language: JavaScript (javascript)
We can copy the source code in there and build.
WORKDIR /my-go-app
COPY app-src .
RUN GOOS=linux GOARCH=amd64 go build ./cmd/app-service
Code language: JavaScript (javascript)
Then, we define another stage based on a Debian distroless image (see next tip).
FROM gcr.io/distroless/static-debian10
Code language: JavaScript (javascript)
COPY the resulting executable from the builder stage using the --from=builder flag.
COPY --from=builder /my-go-app/app-service /bin/app-service
Code language: JavaScript (javascript)
The final image will contain only the minimal set of libraries from distroless/static-debian-10 image and your app executable.
No build toolchain, no source code.
2.2 Create distroless containers built from scratch
Use the minimal required base container to follow Dockerfile best practices.
Ideally, we would create containers from scratch, but only binaries that are 100% static will work.
Distroless are a nice alternative. These are designed to contain only the minimal set of libraries required to run Go, Python, or other frameworks.
For example, if you were to base a container in a generic ubuntu:xenial image:
FROM ubuntu:xenial-20210114
You would include more than 100 vulnerabilities, as detected by Sysdig’s vulnerability management solution, related to the large amount of packages that you are including and probably neither need nor ever use:
❯ docker run -v /var/run/docker.sock:/var/run/docker.sock --rm quay.io/sysdig/secure-inline-scan:2 image-ubuntu -k $SYSDIG_SECURE_TOKEN --storage-type docker-daemon
Inspecting image from Docker daemon -- distroless-1:latest
 Full image:  docker.io/library/image-ubuntu
 Full tag:    localbuild/distroless-1:latest
...
Analyzing image...¦
Analysis complete!
...
Evaluation results
- warn dockerfile:instruction Dockerfile directive 'HEALTHCHECK' not found, matching condition 'not_exists' check
- warn dockerfile:instruction Dockerfile directive 'USER' not found, matching condition 'not_exists' check
- warn files:suid_or_guid_set SUID or SGID found set on file /bin/mount. Mode: 0o104755
- warn files:suid_or_guid_set SUID or SGID found set on file /bin/su. Mode: 0o104755
- warn files:suid_or_guid_set SUID or SGID found set on file /bin/umount. Mode: 0o104755
- warn files:suid_or_guid_set SUID or SGID found set on file /sbin/pam_extrausers_chkpwd. Mode: 0o102755
- warn files:suid_or_guid_set SUID or SGID found set on file /sbin/unix_chkpwd. Mode: 0o102755
- warn files:suid_or_guid_set SUID or SGID found set on file /usr/bin/chage. Mode: 0o102755
...
Vulnerabilities report
  Vulnerability    Severity Package                                  Type     Fix version      URL
- CVE-2019-18276   Low      bash-4.3-14ubuntu1.4                     dpkg     None             http://people.ubuntu.com/~ubuntu-security/cve/CVE-2019-18276
- CVE-2016-2781    Low      coreutils-8.25-2ubuntu3~16.04            dpkg     None             http://people.ubuntu.com/~ubuntu-security/cve/CVE-2016-2781
- CVE-2017-8283    Negligible dpkg-1.18.4ubuntu1.6                     dpkg     None             http://people.ubuntu.com/~ubuntu-security/cve/CVE-2017-8283
- CVE-2020-13844   Medium   gcc-5-base-5.4.0-6ubuntu1~16.04.12       dpkg     None             http://people.ubuntu.com/~ubuntu-security/cve/CVE-2020-13844
...
- CVE-2018-20839   Medium   systemd-sysv-229-4ubuntu21.29            dpkg     None             http://people.ubuntu.com/~ubuntu-security/cve/CVE-2018-20839
- CVE-2016-5011    Low      util-linux-2.27.1-6ubuntu3.10            dpkg     None             http://people.ubuntu.com/~ubuntu-security/cve/CVE-2016-5011
Code language: JavaScript (javascript)
Do you need the gcc compiler or systemd SysV compatibility in your container? Most likely, you don't. The same goes for dpkg or bash.
Instead, if you base your image on gcr.io/distroless/base-debian10:
FROM gcr.io/distroless/base-debian10
Code language: JavaScript (javascript)
Then it will only contain a basic set of packages, including just required libraries like glibc, libssl, and openssl.
For statically compiled applications like Go that don’t require libc, you can even go even slimmer:
FROM gcr.io/distroless/static-debian10
Code language: JavaScript (javascript)
2.3 Use trusted base images
Carefully choose the base for your images (the FROM instruction).
Building on top of untrusted or unmaintained images will inherit all of the problems and vulnerabilities from that image into your containers.
Follow these Dockerfile best practices to select your base images:
- Prefer verified and official images from trusted repositories and providers over images built by unknown users.
- When using custom images, check for the image source and the Dockerfile, and build your own base image. There is no guarantee that an image published in a public registry is really built from the given Dockerfile nor that it is kept up to date.
- Sometimes the official images might not be the better fit, in regards to security and minimalism. For example, comparing the official node image with the bitnami/node image, the latter offers customized versions on top of a minideb distribution. They are frequently updated with the latest bug fixes, signed with Docker Content Trust, and pass a security scan for tracking known vulnerabilities.
2.4 Update your images frequently
Use base images that are frequently updated, and rebuild yours on top of them.
New security vulnerabilities are discovered continuously, so it is a general security best practice to stick to the latest security patches.
However, you may not always want the latest version, which might contain breaking changes. Instead, define a versioning strategy:
- Stick to stable or long-term support versions. These deliver security fixes quickly and often.
- Plan in advance. Be ready to drop old versions and migrate before your base image version reaches the end of its life and stops receiving updates.
- Rebuild your own images periodically. Use a similar strategy to get the latest packages from the base distro, Node, Golang, Python, etc. Most package or dependency managers, like npm or go mod, will offer ways to specify version ranges to keep up with latest security updates.
2.5 Limit exposed ports
Every opened port in your container is an open door to your system. Expose only the ports that your application needs and avoid exposing ports like SSH (22).
Please note that even though the Dockerfile offers the EXPOSE command, it is only informational and for documentation purposes. Exposing the port does not automatically allow connections for all EXPOSED ports when running the container (unless you use docker run --publish-all). You need to specify the published ports at runtime, when executing the container.
Use EXPOSE to flag and document only the required ports in the Dockerfile, and then stick to those ports when publishing or exposing in execution.
3. Prevent confidential data leaks
Be really careful about your confidential data when dealing with containers.
The following Dockerfile best practices will provide advice on how to handle credentials for containers, and how to avoid accidentally leaking undesired files or information.
3.1 Don’t include credentials and other secrets
Never put any secret or credentials in the Dockerfile instructions (environment variables, args, or hard coded into any command).
Be extra careful with files that get copied into the container. Even if a file is removed in a later instruction in the Dockerfile, it can still be accessed on the previous layers as it is not really removed, only “hidden” in the final filesystem.
When building your images, follow these practices:
- If the application supports configuration via environment variables, use them to set the secrets on execution (-e option in docker run), or use Docker secrets, Kubernetes secrets to provide the values as environment variables.
- Use configuration files and bind mount the configuration files in docker, or mount them from a Kubernetes secret.
Also, your images shouldn’t contain confidential information or configuration values that tie them to some specific environment (i.e., production, staging, etc.).
Instead, allow the image to be customized by injecting the values on runtime, especially secrets. You should only include configuration files with safe or dummy values inside, as an example.
3.2 Use the COPY instruction over ADD
Both the ADD and COPY instructions provide similar functions in a Dockerfile. However, COPY is more explicit.
Use COPY unless you really need the ADD functionality, like to add files from an URL or from a tar file. COPY is more predictable and less error prone.
In some cases it is preferred to use the RUN instruction over ADD to download a package using curl or wget, extract it, and then remove the original file in a single step, reducing the number of layers.
Multi-stage builds also solve this problem and help you follow Dockerfile best practices, allowing you to copy only the final extracted files from a previous stage.
3.3 Understand build context and use .dockerignore
Here is a typical execution of a build using Docker, with a default Dockerfile, and the context in the current folder:
docker build -t myimage .
Beware!
The “.” parameter is the build context. Using "." as context is dangerous as you can copy confidential or unnecessary files into the container, like configuration files, credentials, backups, lock files, temporary files, sources, subfolders, dotfiles, etc.
Imagine that you have the following command inside the Dockerfile:
COPY . /my-app
Code language: JavaScript (javascript)
This would copy everything inside the build context, which for the “.” example, includes the Dockerfile itself.
It would be Dockerfile best practices to create a subfolder containing the files that need to be copied inside the container, use it as the build context, and when possible, be explicit for the COPY instructions (avoid wildcards). For example:
docker build -t myimage files/
Code language: JavaScript (javascript)
Also, create a .dockerignore file to explicitly exclude files and directories.
Even if you are extra careful with the COPY instructions, all of the build context is sent to the docker daemon before starting the image build. That means having a smaller and restricted build context will make your builds faster.
Put your build context in its own folder and use .dockerignore to reduce it as much as possible.
4. Misc. Dockerfile best practices
4.1 Group commands for fewer layers
Remember that order in the Dockerfile instructions is very important.
Since RUN, COPY, ADD, and other instructions create a new container layer, grouping multiple commands together will reduce the number of layers.
For example, instead of:
FROM ubuntu
RUN apt-get install -y wget
RUN wget https://â¦/downloadedfile.tar
RUN tar xvzf downloadedfile.tar
RUN rm downloadedfile.tar
RUN apt-get remove wget
It would be a Dockerfile best practice to do:
FROM ubuntu
RUN apt-get install wget && wget https://.../downloadedfile.tar && tar xvzf downloadedfile.tar && rm downloadedfile.tar && apt-get remove wget
Code language: JavaScript (javascript)
Also, place the commands that are less likely to change, and easier to cache first.
Instead of:
FROM ubuntu
COPY source/* .
RUN apt-get install nodejs
ENTRYPOINT ["/usr/bin/node", "/main.js"]
Code language: JavaScript (javascript)
It would be better to do:
FROM ubuntu
RUN apt-get install nodejs
COPY source/* .
ENTRYPOINT ["/usr/bin/node", "/main.js"]
Code language: JavaScript (javascript)
The nodejs package is less likely to change than our application source.
Please remember that executing a rm command removes the file on the next layer, but it is still available and can be accessed, as the final image filesystem is composed from all the previous layers.
So, don't copy confidential files and then remove them, they will be not visible in the final container filesystem but still be easily accessible.
4.2 Add metadata labels
It is a Dockerfile best practice to include metadata labels when building your image.
Labels help in image management, like including the application version, a link to the website, how to contact the maintainer, and more.
You can take a look at the predefined annotations from the OCI image spec, which deprecate the previous Label schema standard draft.
4.3 Use linting to detect bad Dockerfile practices
Tools like Haskell Dockerfile Linter (hadolint) can detect bad practices in your Dockerfile, and even expose issues inside the shell commands executed by the RUN instruction.
Consider incorporating such a tool in your CI pipelines.
Image scanners are also capable of detecting bad practices via customizable rules, and report them along with image vulnerabilities:
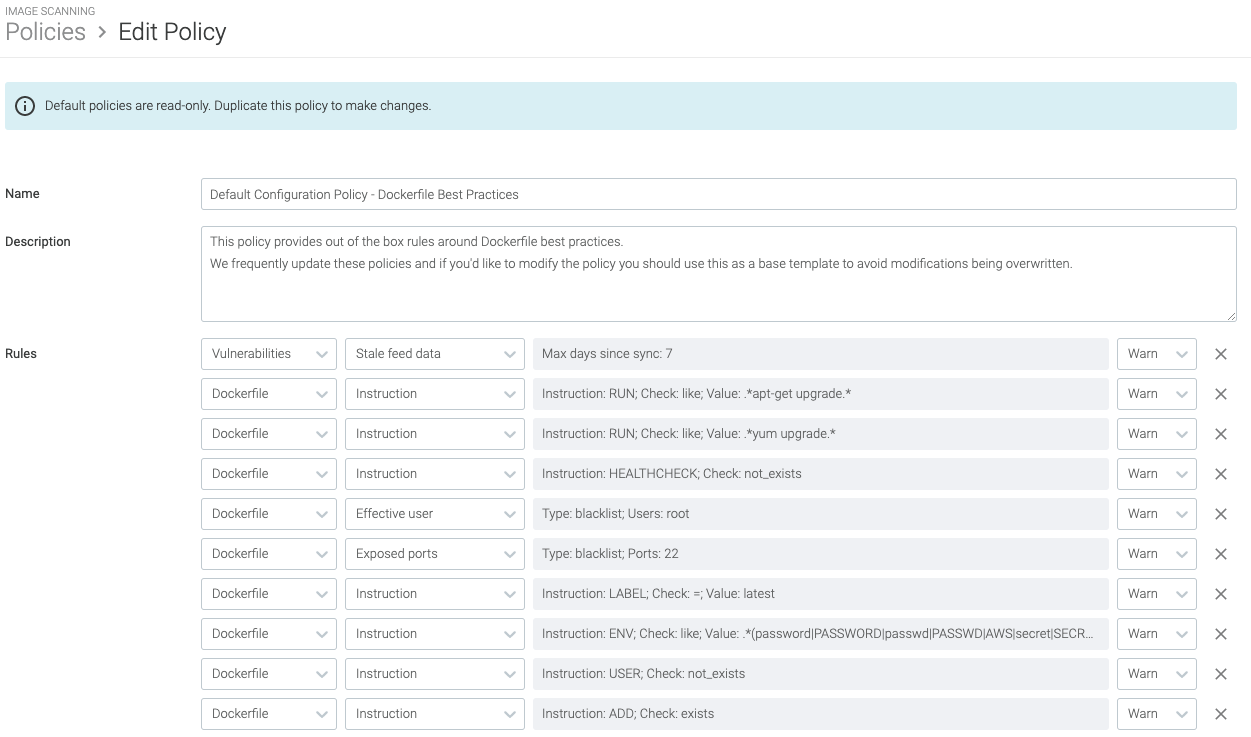
Some of the misconfigurations you can detect are images running as root, exposed ports, usage of the ADD instruction, hardcoded secrets, or discouraged RUN commands.
4.4 Locally scan images during development
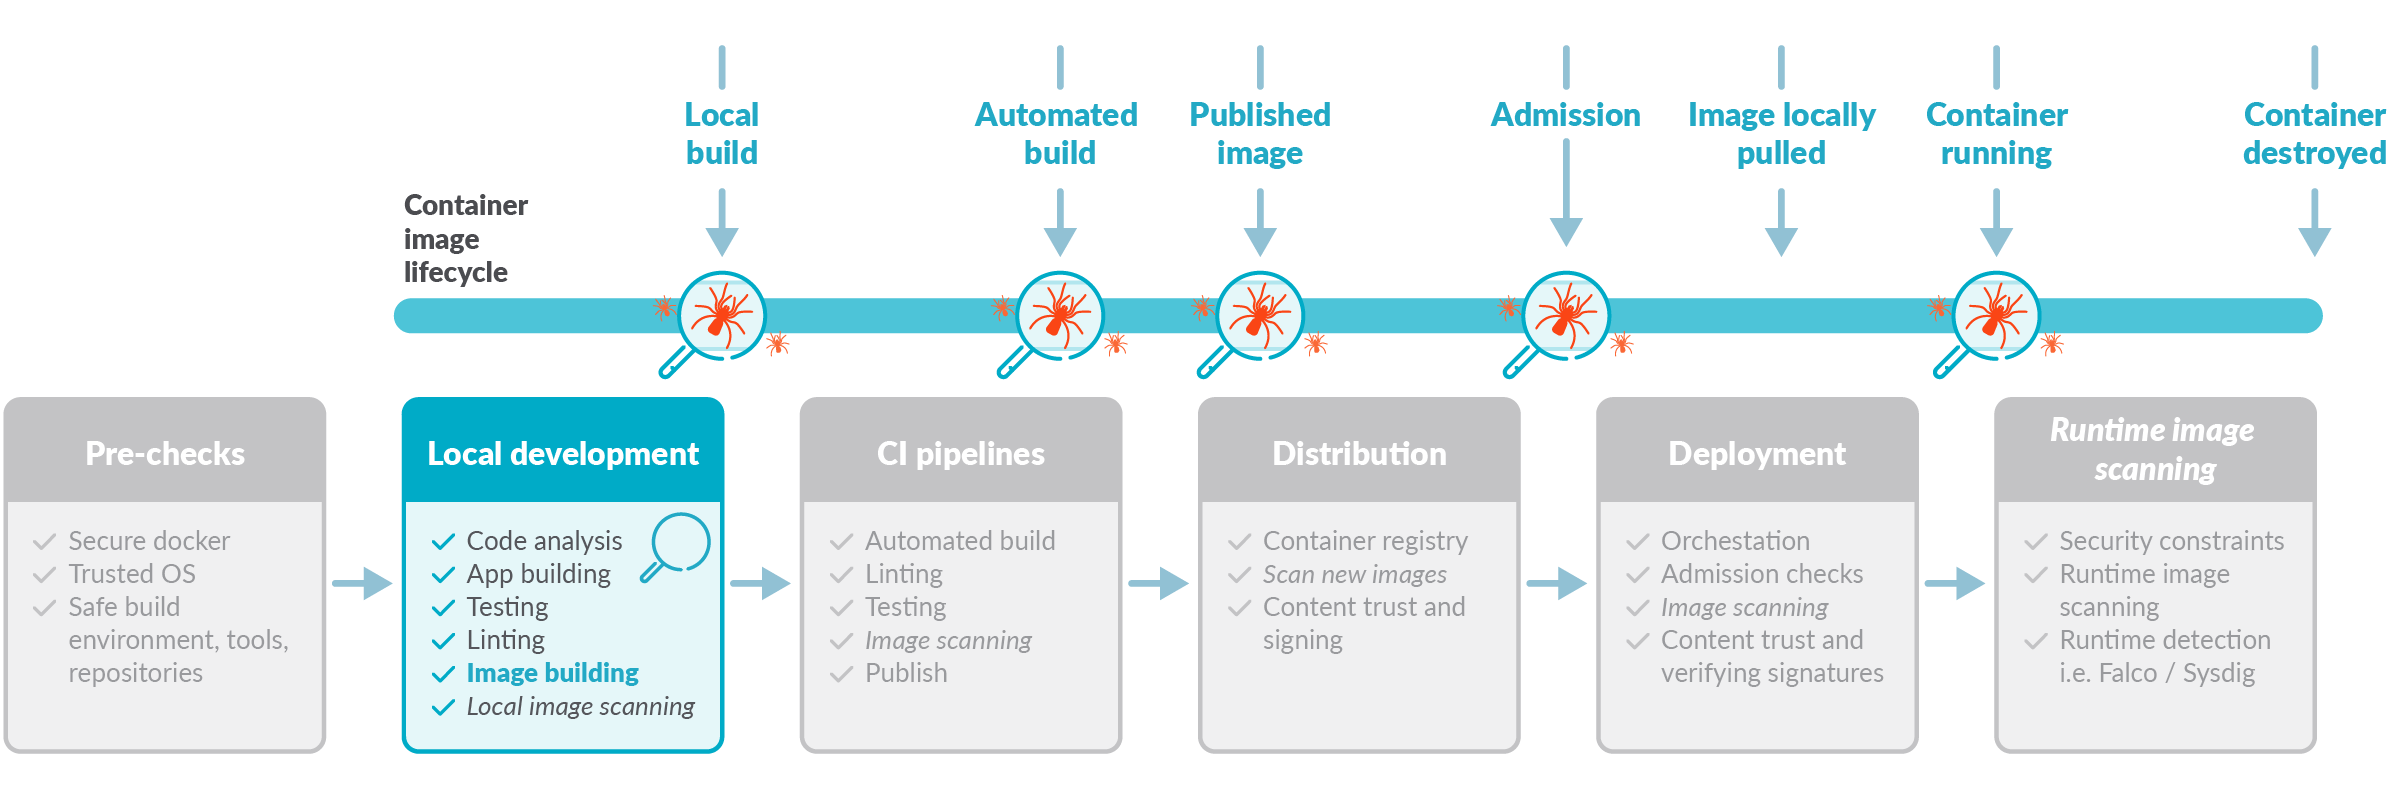
Image scanning is another way of detecting potential problems before running your containers. In order to follow the image scanning best practices, you should scan during different stages of the image lifecycle and even after the image is pushed to a container registry.
It is a security best practice to apply the “shift left security” paradigm by directly scanning your images, as soon as they are built, in your CI pipelines before pushing to the registry. This also includes the developer computer.
And remember, a scanned image might be “safe” now. But as it ages and new vulnerabilities are discovered, it might become dangerous.
Periodically reevaluate for new vulnerabilities.

5. Beyond image building
So far, we have focused on the image building process and discussed tips for creating optimal Dockerfiles. But let’s not forget about some additional pre-checks and what comes after building your image: running it.
5.1 Protect the Docker socket
The Docker socket is a big privileged door into your host system that can be used for intrusion and malicious software usage.
Make sure your /var/run/docker.sock has the correct permissions, and if docker is exposed via TCP (which is not recommended at all), make sure it is properly protected.
5.2 Sign images and verify signatures
It is a Dockerfile best practice to use Docker content trust, Docker notary, Harbor notary, or similar tools to digitally sign your images and then verify them on runtime.
Enabling signature verification is different on each runtime. For example, in docker this is done with the DOCKER_CONTENT_TRUST environment variable:
export DOCKER_CONTENT_TRUST=1
5.3 Be aware of tag mutability
In container land, tags are a volatile reference to a concrete image version at a specific point in time.
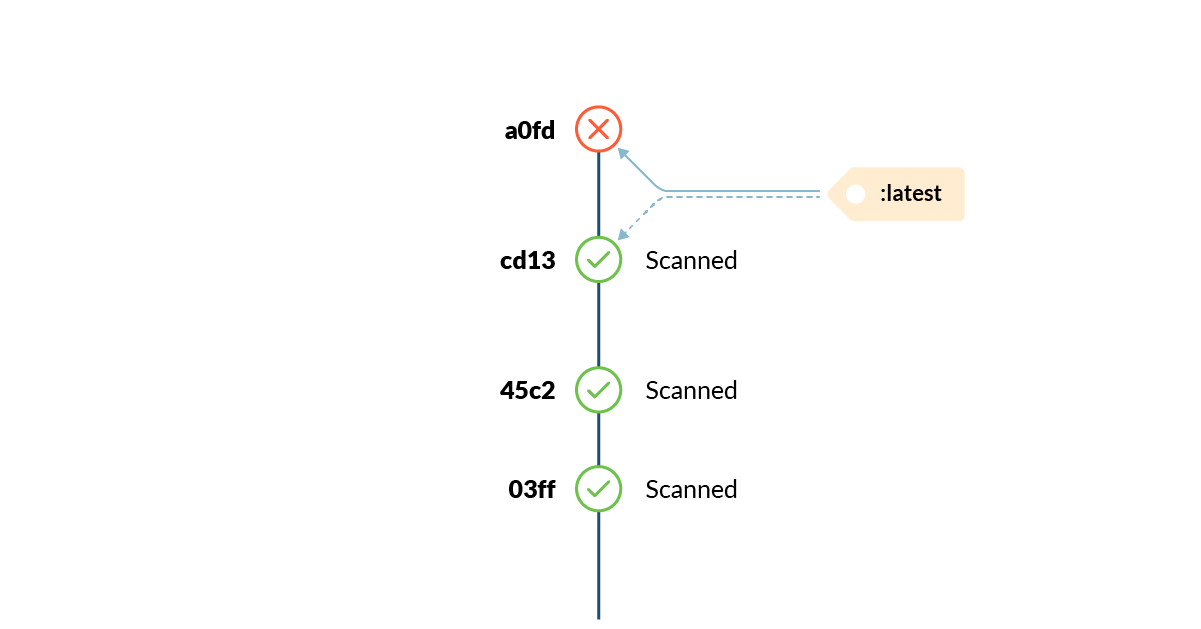
Tags can change unexpectedly, and at any moment. See our “Attack of the mutant tags” to learn more.
5.4 Include health and liveness checks
When using plain Docker or Docker Swarm, include a HEALTHCHECK instruction in your Dockerfile whenever possible. This is critical for long-running or persistent services in order to ensure they are healthy, and manage restarting the service otherwise.
If running your images in Kubernetes, use livenessProbe configuration inside the container definitions, as the docker HEALTHCHECK instruction won’t be applied.
5.5 Drop capabilities from containers
Also in execution, you can restrict the application capabilities to the minimal required set using --cap-drop flag in Docker or securityContext.capabilities.drop in Kubernetes.
That way, in case your container is compromised, the range of action available to an attacker is limited.
Also, see more information on how to apply AppArmor and Seccomp as additional mechanisms to restrict container privileges:
- AppArmor in Docker or Kubernetes
- Seccomp in Docker or Kubernetes.
Secure containers and container images with Sysdig
Get comprehensive container security with Sysdig’s cloud workload protection platform (CWPP). Discover threats and get contextual information about vulnerabilities and other risks that will actually impact your production environment.
Sysdig ensures your container images are secure, alerting you when they need updates or when suspicious activity happens, such as an unexpected shell spawn.
Also, check out our article on 12 container image scanning best practices to help you shift left security.
Vulnerability scanning with Sysdig Secure will help you follow these Dockerfile best practices. It will help you shift left security by checking for vulnerabilities and misconfigurations, allowing you to act before threats are deployed. You’ll be set in only a few minutes. Try it today!

Top 5 use cases for securing cloud and containers
Keep your containers safe, while keeping up with the speed of innovation.